Time Tracker
I need an accurate and up-to-the-minute overview of the hours I’ve worked on projects, without having to go through the hassle of reviewing my calendar at the end of the week and manually filling out spreadsheets.
The Navigo3 information system addresses this issue with its integrated Time Tracking feature, which allows you to record hours worked in real time directly while on the job. This eliminates the need for additional estimates and the time-consuming task of retroactively logging hours. With a single click, the recorded time can be converted into an accurate timesheet, keeping project financial and capacity plans constantly up to date.
Contents
What Is Time Tracker
Prerequisites and Initial Setup
Employee View (Tracking and Reporting)
Manager’s View (Settings and Reports)
What Is Time Tracker?
The Time Tracking feature functions as a smart stopwatch integrated directly into the Navigo3 system header. Its main benefit is the elimination of errors and the administrative burden associated with retroactive time reporting at the end of the day or week. The employee simply starts the timer when beginning a task, and the system takes care of the rest.
The timer runs regardless of whether you are in Navigo, or rather, it runs until you turn it off. If you leave the timer running overnight, Navigo automatically detects this and provides you with a clear breakdown of the time by day.
Prerequisites and Initial Settings
To take full advantage of time trackers capabilities in the system, the following conditions must be met:
- The “Time Tracker” feature must be enabled in System Settings.
- At least one open project must be created.
- Job types must be defined in the system.
An Employee’s Perspective (Measurement and Reporting)
As a regular employee, you use a stopwatch to track your daily work. The system is designed to minimize administrative tasks and allow you to focus fully on the task at hand.
Start Timing
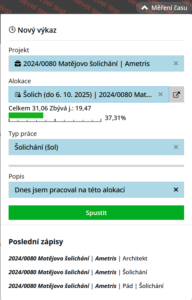
When you begin working on the allocation, follow these steps:
- On the right side of the top panel in Navigo3, click the stopwatch icon.
- In the ” Project ” field, select the project you will be working on.
- If you have been assigned a specific task on this project, select it in the ” Allocation” field. In that case, the system will also automatically populate the” Task Type” field.
- If required by your company, enter a brief summary of the activity being performed in the ” Description ” field.
- Click the green ” Start ” button to begin the measurement.
Working with Live Measurements
While the stopwatch is running, you can perform the following actions:
- Editing Data on the Fly: If you find that you need to edit a task description or refine the allocation, open the stopwatch panel, make the changes, and click the ” Save Changes” button. You won’t be able to generate a report from “Measurements” until you save the changes.
- Recent Entries: On the right side of the stopwatch panel, you’ll see an overview of your recent measurements, from which you can quickly pre-fill a measurement by clicking on it.
Termination and Reporting of Work
- Click the “Stop” button to the right of the running time.
- Open the stopwatch panel in the header. Click the ” Report” button. The stopwatch will stop, and the recorded time will immediately be saved as a new work report.
- If you want to discard the recorded time (e.g., if you started the timer by mistake), click the Cancel button. The system will display a confirmation prompt: “Are you sure you want to discard the recorded time? This action cannot be undone.” Confirming this will delete the measurement.
Unusual Situations and Warnings
Navigo3 ensures that you do not accidentally report invalid data. You may encounter the following statuses:
- Measurement too short: If you stop the stopwatch before one minute has elapsed, the system will prompt you to edit the entry. Such a time cannot be recorded, and you must either extend it or discard it.
- Running Past Midnight: If you forget to turn off the stopwatch and the timing extends past midnight, a warning banner will appear stating “Timing extends past midnight.” Clicking the “Report” button opens the “Reported Days” wizard, where you’ll see a breakdown by calendar day. Here, you can adjust the hours for each day and then save your changes.
- Long measurements (more than 10 hours): The system displays a yellow warning that says ” The measurement is taking longer than 10 hours,” alerting you that you may have forgotten to stop the stopwatch.
- Extremely long measurements (more than 20 hours): A red banner will appear stating, “The measurement is taking longer than 20 hours.” Clicking ” Show ” will stop the stopwatch, and you must manually adjust the time to the actual value before saving.
Manager’s View (Settings and Reports)
From a manager’s or administrator’s perspective, Timetracker is a tool for gathering accurate data on project costs and for reducing employee resistance to time tracking.
Enabling a Feature in the System
Time tracking is a global feature that you can enable or disable for the entire company:
- Go to the System Settings module > Reporting.
- Find the “Time Tracker” section.
- Enable this feature by checking the corresponding box. From now on, all users will see a stopwatch icon in the header.
Review and Evaluation of Reports
When analyzing time spent on projects, you can easily see which data was entered in real time and which was entered retroactively:
- Open the overview of timesheets in the Timesheets module.
- In the filter, look for the entry ” Created via time tracker.”
- Select the desired filter:
- with or without time tracking – displays all reports (default setting),
- not generated based on time tracking —displays only reports entered manually and retroactively,
- Created based on time tracker — filters only items measured with a stopwatch.
This filter allows you to assess the team’s discipline in using stopwatches and verify the accuracy of the reported data.